
stamp printing with kohlrabi
Did you ever do potato printing in your childhood, maybe in kindergarten or at home?
I remember the cutting and crafting of stamps and printing experiments from art lessons in primary school. Since then, I've tried many different materials for printing, like lino cut panels, foam rubber, sponges, yarn-wrapped wood blocks, cardboard and some more.
When I found an old, shriveled up kohlrabi in the fridge, I thought of the crafting experiences of my childhood days and the following experiment commenced.

Here's this experiments' protagonist - the poor old kohlrabi. It's definitely not fit for eating anymore, but it would be a shame to just throw it out and waste it completely!
That's why it's getting a 'second life' as experimental object for stamp printing.
Let's see what we can make with it!

First, the kohlrabi was sliced in half horizontally which revealed the kind of dried out, spongy insides. The tuber ist still firm enough to stay in it's form and be cut into shape.
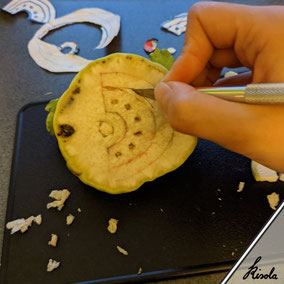
I prepared two motifs on paper templates, to be cut into the material. A small crafting cutter is also all ready to use.


Piece by piece, the motif is wittled out of the kohlrabi. The cutting can not be done as detailled as I had imagined, so I leave out a few of the smaller elements.
It's a good idea to start with a clear image in mind, which parts should stay in the motif so you know which have to be cut away. Accidents happen, but it would be sad to ruin the stamp.
And here's motif number two, a small abstract rainbow. For the finer details like the dots, the template is only a guide, like doing a sketch with the cutting tool. After marking the intended positions, I cut them by eye-measurement. At this point, the spongy and soft texture of the material did not help at all, but I'm hoping it will still look good in print!

Two parts of the old kohlrabi - two new stamps!
I'm done cutting and these are both my finished motifs. All the outer edges around the cross and rainbow are carefully sliced off in big chunks. This is to prevent the material from accidentally leaving unwanted paint marks later on in printing. All the cut off scraps can be composted.

The first printing trial I did with water colours. The paint can easily be applied to the stamp with a brush. I'm using a watertank brush that allows for good control over the amount of water in the paint. It's also great for using multiple colours on the stamp, and print them all at once. My choice of colours is kind of random, I like blue and green together.

Time to print!
My chosen paper to print on is a sturdy watercolour paper of 200g/m2. It absorbs the water and wet paint really well without curling or warping.
By placing and pressing the prepared stamp vertically onto the paper, slipping can be prevented and the print will turn out nice and crisp.

A closer look of the print result reveals the fascinating texture that the combination of kohlrabi and watercolour makes on the paper. After a while, some more delicate parts of the stamp got a bit pushed out of position, and the motifs don't turn out as symmetrical as in the beginning. But I like that no two prints look the same!

I tried several different colour combinations, also variating the shades by slightly altering the mixed paint colour for every print, sometimes a bit darker or lighter or just more saturated. Filling all of the paper by printing one motif after the other, closely together, went really quickly. Renewing the paint before every print makes for the best and most precise results.

After all the paint was dried thoroughly, I cut the large paper into smaller parts that fit my scanner format, to digitize the prints.
As mentioned before, the sturdy paper did not curl from the watercolour and lies perfectly smooth on the glass. This way, scanning and later cropping the motifs from the background goes very smoothly.

The best prints are chosen based on matching colour, opacity and coverage, and wholeness of the motifs. Using Adobe Photoshop, and a bit of trial and error, I created different arrangements of the motifs into a seamless repeat.
This can now be put next to itself in all directions to fill any format size with an even distribution of printed crosses and rainbows.

There's no textile product with these patterns on them, yet. But I think they would also look great on stationary or the sketchbooks in the mockup picture, right?
The kohlrabi stamps stayed usable for a few days by putting them in the fridge when not printing. Quite a few pages could be filled with different prints this way.
Of course they are not as durable as rubber foam or lino cut material, but on the other hand the vegetable is completely biodegradable.
For that reason I did not use any acrylic paint but watercolours.
Both resulting patterns can be found in my Spoonflower shop, printed on fabric yardage of different fibre types and qualities for your own project ideas or ready-made home decor textiles.
Please share your creations if my blog inspired you to try a printing experiment yourself! I'd love to see what you create!

